September 19, 2025
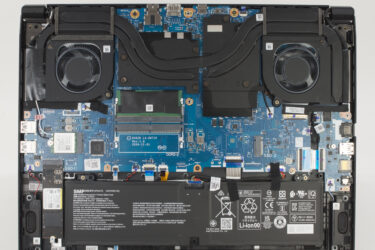
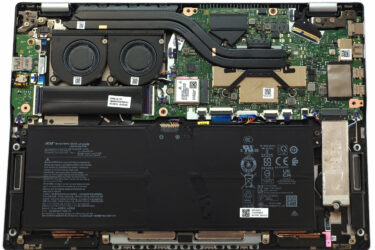
0How to open Acer Predator Helios Neo 16S AI (PHN16S-71) – disassembly and upgrade options
Step 1: Opening the Acer Predator Helios Neo 16S AI (PHN16S-71) Power off the laptop and place it on a stable surface. Undo the ten Torx-T6 screws securing the bottom panel. Use a thin plastic…
July 17, 2025
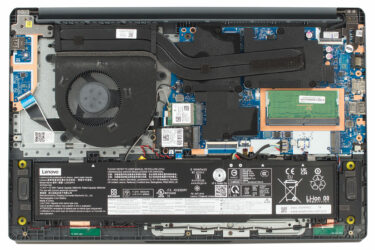
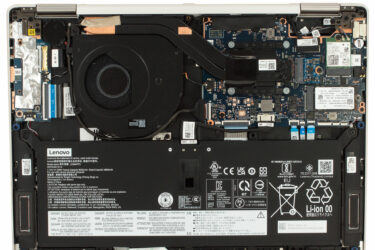
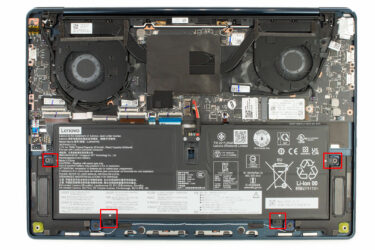
0How to open Lenovo LOQ Essential 15″ (Gen 9, 15IAX9E) – disassembly and upgrade options
The Lenovo LOQ Essential 15″ (Gen 9, 15IAX9E) opens easily after removing nine Torx T5 screws – three short 4 mm units at the front and six longer 6 mm screws toward the middle and…
July 16, 2025
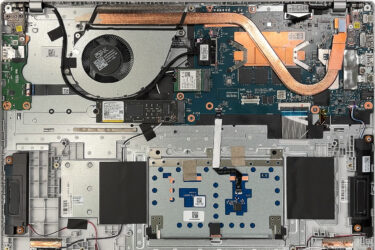
0How to open ASUS Vivobook 16 X1607 – disassembly and upgrade options
Removing ten JIS-standard screws and popping a few plastic clips is all it takes to lift the bottom panel, giving an unobstructed view of the ASUS Vivobook 16 X1607’s internals. The precision-touchpad mechanism is secured…
July 16, 2025
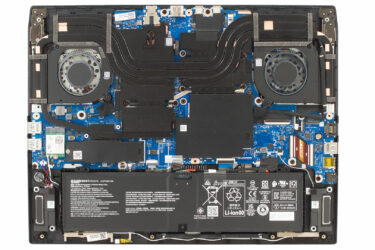
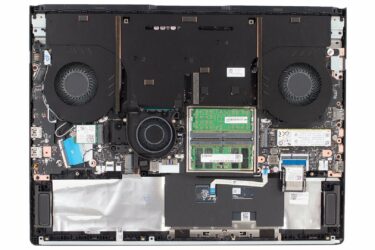
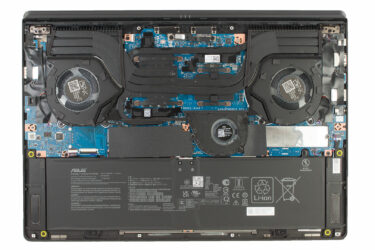
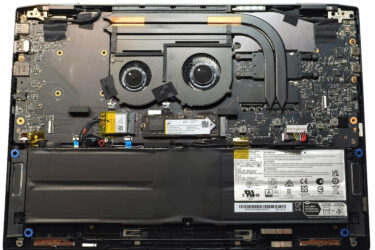
0How to open MSI Vector 16 HX AI A2XW – disassembly and upgrade options
Getting inside the MSI Vector 16 HX AI A2XW starts with flipping the machine over to admire its heavily vented bottom panel – the copper heat pipes are already visible through the geometric grills, hinting…
July 15, 2025
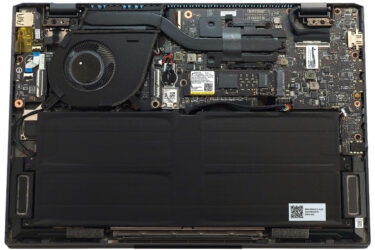
0How to open Acer Nitro V 16 AI (ANV16-61) – disassembly and upgrade options
Opening the Acer Nitro V 16 AI (ANV16-61) is refreshingly simple: undo ten Phillips-head screws from the bottom plate. Once removed, the aluminium cover can be lifted by hand—no pry tools required if you work…
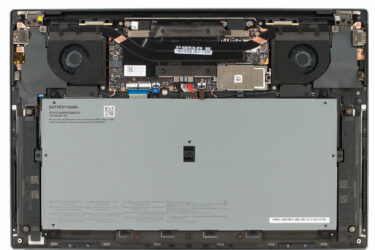
July 15, 2025
0How to open Lenovo Legion Pro 7i Gen 10 (16″ Intel) – disassembly and upgrade options
Removing the bottom plate of the Lenovo Legion Pro 7i Gen 10 (16″ Intel) is straightforward: undo ten JIS-1 screws—six long M2 × 12 mm and four short M2 × 4 mm. After loosening them,…
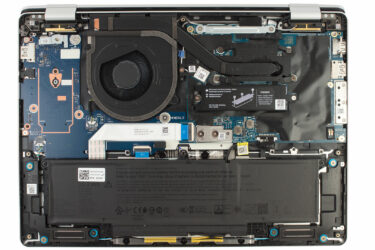
July 14, 2025
1How to open Lenovo Yoga 7i 2-in-1 (14″, Gen 10 / 14ILL10) – disassembly and upgrade options
Accessing the Lenovo Yoga 7i 2-in-1 (14″, Gen 10 / 14ILL10) starts with a Torx T5 driver. Remove seven screws from the bottom plate: four short 3 mm screws near the front and three longer…
July 14, 2025
0How to open Dell Pro 14 Plus (PB14250) – disassembly and upgrade options
Opening the Dell Pro 14 Plus (PB14250) Power down the Dell Pro 14 Plus (PB14250) and unplug any connected cables. Loosen the eight captive JIS-1 screws securing the bottom plate. These screws will remain…
July 07, 2025
0How to open Dell Latitude 5455 – disassembly and upgrade options
Step 1: Opening the Dell Latitude 5455 Power off the laptop and disconnect it from any power source. Place it on a clean, static-free surface. Using a JIS №0 screwdriver, unscrew the seven screws securing…
July 07, 2025
0How to open Lenovo ThinkPad X9-15 Gen 1 – disassembly and upgrade options
Step 1: Opening the Lenovo ThinkPad X9-15 Gen 1 Power off the laptop and place it on a flat, static-free surface. Loosen the six captive Phillips-head screws on the bottom panel—these screws stay attached to…
July 05, 2025
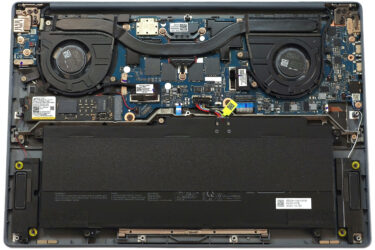
1How to open ASUS ProArt P16 H7606 (2025) – disassembly and upgrade options
Step 1: Opening the ASUS ProArt P16 (H7606) Power off the laptop and place it on a stable, static-free surface. Carefully remove the two rubber caps concealing screws near the front edge using a precision…
July 05, 2025
0How to open Lenovo Yoga 9i 2-in-1 Aura Edition (14ILL10) – disassembly and upgrade options
Step 1: Opening the Lenovo Yoga 9i 2-in-1 Aura Edition (14ILL10) Power off the laptop and place it on a stable, static-free surface. Remove the four visible screws on the bottom panel using a Phillips…
July 04, 2025
0How to open MSI Prestige 13 AI+ Evo A2VM – disassembly and upgrade options
Step 1: Opening the MSI Prestige 13 AI+ Evo A2VM Power off the laptop and place it on a stable, static-free surface. Undo the seven Phillips-head screws securing the bottom plate. Using a lever tool,…
July 04, 2025
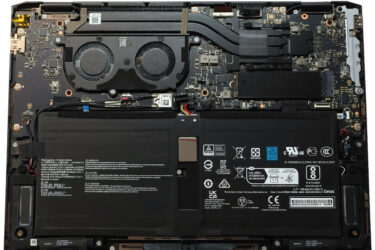
1How to open Acer Swift 14 AI (SF14-61T) – disassembly and upgrade options
Step 1: Opening the Acer Swift 14 AI (SF14-61T) Shut down the laptop and place it on a stable surface. Undo the ten Torx-head screws securing the bottom panel. Pop the two areas behind the…
July 03, 2025
0How to open ASUS Zenbook A14 (UX3407) – disassembly and upgrade options
Step 1: Opening the ASUS Zenbook A14 (UX3407) Shut down the laptop and place it on a stable surface. Undo the ten Torx-head screws securing the bottom panel. Insert a thin plastic tool at one…
July 03, 2025
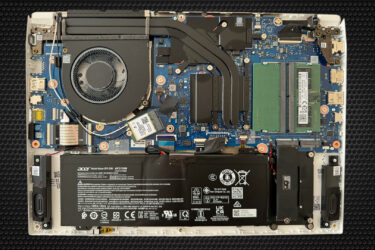
0How to open Acer Nitro V 14 (ANV14-61) – disassembly and upgrade options
Step 1: Opening the Acer Nitro V 14 (ANV14-61) Shut down the laptop and place it on a stable, static-free surface. Undo the nine Phillips-head screws securing the bottom panel. Carefully pry the panel off…
July 03, 2025
0How to open MSI Summit 13 AI+ Evo (A2VMx) – disassembly and upgrade options
Step 1: Opening the MSI Summit 13 AI+ Evo (A2VMx) Power off the laptop and place it on a static-free surface. Undo the four Phillips-head screws securing the bottom panel. Note: the top screws are…
July 02, 2025
0How to open MSI Summit A16 AI+ (A3HMx) – disassembly and upgrade options
Step 1: Opening the MSI Summit A16 AI+ (A3HMx) Power off the laptop and place it on a static-free surface. Undo the seven Phillips-head screws securing the bottom panel. Note that the screws have rubber…
June 30, 2025
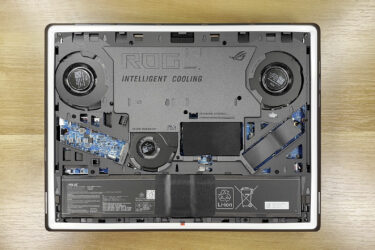
1How to open ASUS ROG Strix G16 G615 (2025) – disassembly and upgrade options
Step 1: Opening the ASUS ROG Strix G16 G615 (2025) Power off the laptop and place it on a soft, static-free surface. Locate the two Q-Latch slider windows on the aluminum bottom panel. Slide both…

May 28, 2025
0How to open ASUS ROG Strix SCAR 18 G835 (2025) – disassembly and upgrade options
Opening the ASUS ROG Strix SCAR 18 G835 Hint: This model features a tool-less rear access panel with a locking mechanism—no screws required. Ensure both locking markers show red—this indicates the unlocked position. Pull the…


![[June 2026] Amazon Italy: Top 10 Best-Selling Laptops – Apple MacBook Neo Dominates Sales, Highlighting a Diverse Market](https://laptopmedia.com/wp-content/uploads/2026/07/Best-Selling-Laptops-IT-Top-10-400x225.jpg)
![[June 2026] Amazon Italy: Top 7 Best-Selling Gaming Laptops – ASUS Dominates with TUF Gaming A16 (FA608) as the Undisputed #1](https://laptopmedia.com/wp-content/uploads/2026/07/Best-Selling-Gaming-Laptops-IT-Top-10-400x225.jpg)
![[June 2026] Best-Selling Laptop Brands on Amazon Italy – Apple Leads Revenue as HP Dominates Volume](https://laptopmedia.com/wp-content/uploads/2026/07/IT-Best-Brands-400x225.jpg)
![[June 2026] Amazon France: Top 10 Best-Selling Laptops – The Surprisingly Affordable Apple MacBook Neo Dominates at #1](https://laptopmedia.com/wp-content/uploads/2026/07/Best-Selling-Laptops-FR-Top-10-400x225.jpg)
![[June 2026] Amazon France: Top 3 Best-Selling Gaming Laptops – ASUS TUF Gaming A16 Claims #1 Spot, Lenovo Dominates with Two Models](https://laptopmedia.com/wp-content/uploads/2026/07/Best-Selling-Gaming-Laptops-FR-Top-10-400x225.jpg)