July 17, 2024
0How to open MSI Prestige 14 AI Studio C1U – disassembly and upgrade options
Opening the Device Undo the 7 Phillips-head screws securing the bottom panel. Flip the laptop and use a thin plastic tool to pry the back hinge cover. Open the lid and pry the front and…
July 09, 2024
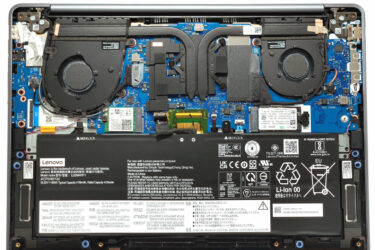
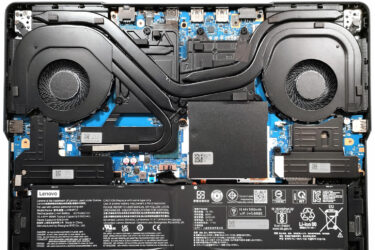
0How to open Lenovo Yoga Slim 7i (14, Gen 9) – disassembly and upgrade options
Opening the Device Undo the six Torx-head screws securing the bottom panel. Use a lever tool to lift the zone behind the hinge near the top corners to create a slight gap. Pry the sides…
April 10, 2024
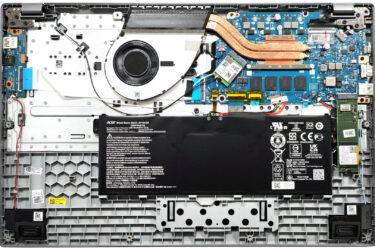
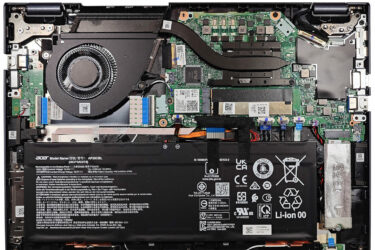
0How to open Acer Aspire 5 (A517-58M) – disassembly and upgrade options
Step 1: Opening the Acer Aspire 5 (A517-58M) Ensure the Acer Aspire 5 is powered off and placed on a protective surface to avoid scratches. Remove the 11 Philips head screws from the bottom of…
April 10, 2024
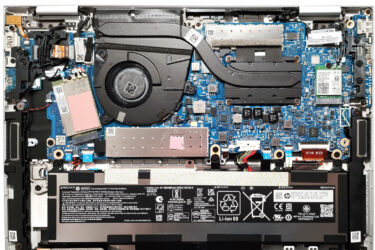
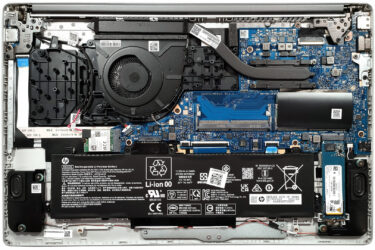
0How to open HP Elite x360 1040 G10 – disassembly and upgrade options
Step 1: Opening the HP Elite x360 1040 G10 Ensure the HP Elite x360 1040 G10 is powered off and placed on a soft, protective surface to prevent scratches. Remove the five captive Phillips-head screws…
April 09, 2024
0How to open HP Spectre x360 16 (16-aa0000) – disassembly and upgrade options
Step 1: Opening the HP Spectre x360 16 (16-aa0000) Ensure the HP Spectre x360 16 is powered off and placed on a protective surface to avoid scratches. Remove the four Torx-head screws located at the…
April 09, 2024
0How to open HP Envy x360 15 (15-fe0000) – disassembly and upgrade options
Step 1: Opening the HP Envy x360 15 (15-fe0000) Ensure the HP Envy x360 15 is powered off and placed on a soft, protective surface to prevent scratching. Remove the 4 Torx-head screws securing the…

April 09, 2024
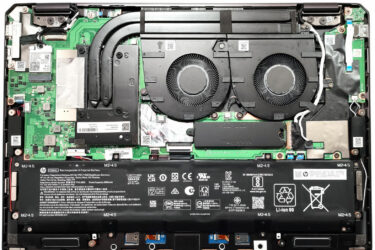
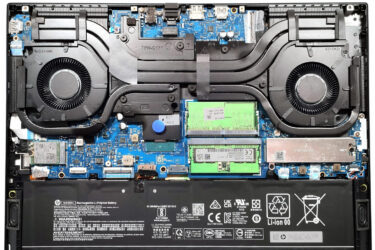
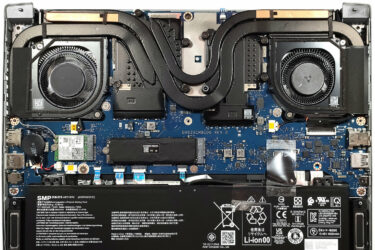
0How to open Acer Predator Helios Neo 18 (PHN18-71) – disassembly and upgrade options
Step 1: Opening the Acer Predator Helios Neo 18 (PHN18-71) Power off the laptop and place it on a soft surface to avoid scratches. Remove the 13 Torx-head screws from the bottom panel. Carefully lift…
April 09, 2024
0How to open ASUS TUF Gaming A16 FA607 (2024) – disassembly and upgrade options
Step 1: Accessing the ASUS TUF Gaming A16 FA607 (2024) Internals Ensure the ASUS TUF Gaming A16 FA607 is turned off and placed on a protective surface to prevent scratches. Remove the 12 Philips-head screws…
April 09, 2024
0How to open HP OMEN Transcend 16 (u1000) – disassembly and upgrade options
Step 1: Opening the HP OMEN Transcend 16 (u1000) Ensure the HP OMEN Transcend 16 is turned off and placed on a soft, protective surface to avoid damage. Remove the 6 Phillips-head screws securing the…
April 03, 2024
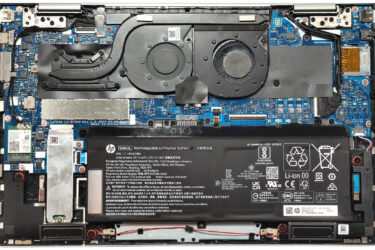
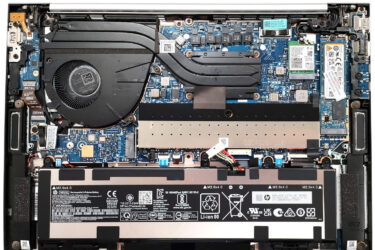
0How to open HP EliteBook 840 G10 – disassembly and upgrade options
Step 1: Opening the HP EliteBook 840 G10 Ensure the HP EliteBook 840 G10 is powered off and placed on a soft surface to prevent scratches. Remove the 5 captive Phillips-head screws that secure the…
April 03, 2024
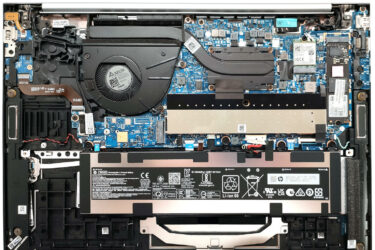
0How to open HP EliteBook 865 G10 – disassembly and upgrade options
Step 1: Opening the HP EliteBook 865 G10 Ensure the HP EliteBook 865 G10 is powered off and placed on a protective surface. Unscrew the 5 captive Phillips-head screws that secure the bottom panel. Use…

April 03, 2024
0How to open ASUS Vivobook S 14 Flip OLED (TP3402) – disassembly and upgrade options
Step 1: Accessing the ASUS Vivobook S 14 Flip OLED (TP3402) Internals Ensure the ASUS Vivobook S 14 Flip OLED is powered off and placed on a soft surface to avoid scratches. Remove the 10…
April 03, 2024
0How to open Lenovo Yoga 6 (13, Gen 8) – disassembly and upgrade options
Step 1: Removing the Bottom Panel of Lenovo Yoga 6 (13, Gen 8) Ensure the Lenovo Yoga 6 is powered off and placed on a soft surface to prevent any damage. Remove the 6 Phillips-head…
February 01, 2024
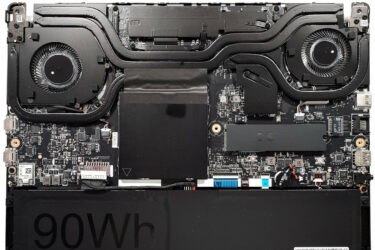
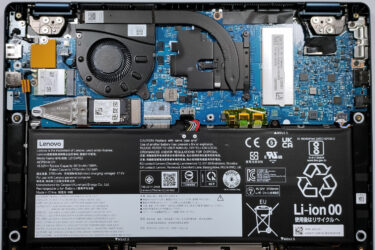
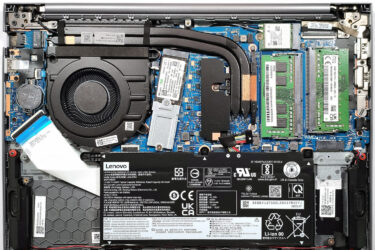
0How to open Lenovo Legion Pro 5i (16, Gen 9) – disassembly and upgrade options
Step 1: Accessing the Lenovo Legion Pro 5i (16, Gen 9) Internals Ensure the Lenovo Legion Pro 5i is powered off and placed on a soft surface to prevent damage. Remove the 10 Torx-head screws…
February 01, 2024
0How to open HP 250 G10 – disassembly and upgrade options
Step 1: Accessing the Internal Components Ensure the HP 250 G10 is powered off and placed on a soft, clean surface to prevent scratches or damage. Remove the four Phillips-head screws from the bottom of…

February 01, 2024
1How to open ASUS Zenbook 14 (UM3402) – disassembly and upgrade options
Step 1: Accessing the Internal Components Ensure the ASUS Zenbook 14 (UM3402) is powered off and placed on a soft, clean surface to prevent scratches or damage. Remove the 7 Torx-head screws from the bottom…
February 01, 2024
0How to open ASUS ROG Ally (2023) – disassembly and upgrade options
Step 1: Accessing the Internal Components Ensure the ASUS ROG Ally (2023) is powered off and placed on a soft, clean surface to prevent scratches or damage. Remove the six Phillips-head screws from the bottom…
February 01, 2024
0How to open Lenovo ThinkBook 14 Gen 6 (AMD) – disassembly and upgrade options
Step 1: Accessing the Internal Components Ensure the Lenovo ThinkBook 14 Gen 6 (AMD) is powered off and placed on a soft, clean surface to prevent scratches or damage. Remove the 9 Phillips-head screws from…
February 01, 2024
0How to open Acer TravelMate P4 (TMP413-51) – disassembly and upgrade options
Step 1: Accessing the Internal Components Ensure the Acer TravelMate P4 (TMP413-51) is powered off and placed on a soft, clean surface to prevent scratches or damage. Remove the 9 Torx-head screws from the bottom…
February 01, 2024
0How to open Acer Predator Triton 14 (PT14-51) – disassembly and upgrade options
Step 1: Accessing the Internal Components Ensure the Acer Predator Triton 14 (PT14-51) is powered off and placed on a soft, clean surface to prevent scratches or damage. Remove the 9 Torx-head screws from the…


![[June 2026] Amazon Italy: Top 10 Best-Selling Laptops – Apple MacBook Neo Dominates Sales, Highlighting a Diverse Market](https://laptopmedia.com/wp-content/uploads/2026/07/Best-Selling-Laptops-IT-Top-10-400x225.jpg)
![[June 2026] Amazon Italy: Top 7 Best-Selling Gaming Laptops – ASUS Dominates with TUF Gaming A16 (FA608) as the Undisputed #1](https://laptopmedia.com/wp-content/uploads/2026/07/Best-Selling-Gaming-Laptops-IT-Top-10-400x225.jpg)
![[June 2026] Best-Selling Laptop Brands on Amazon Italy – Apple Leads Revenue as HP Dominates Volume](https://laptopmedia.com/wp-content/uploads/2026/07/IT-Best-Brands-400x225.jpg)
![[June 2026] Amazon France: Top 10 Best-Selling Laptops – The Surprisingly Affordable Apple MacBook Neo Dominates at #1](https://laptopmedia.com/wp-content/uploads/2026/07/Best-Selling-Laptops-FR-Top-10-400x225.jpg)
![[June 2026] Amazon France: Top 3 Best-Selling Gaming Laptops – ASUS TUF Gaming A16 Claims #1 Spot, Lenovo Dominates with Two Models](https://laptopmedia.com/wp-content/uploads/2026/07/Best-Selling-Gaming-Laptops-FR-Top-10-400x225.jpg)