How to open HP OMEN MAX 16 (Intel, 16-ah0000) – disassembly and upgrade options

Before you start: Shut the laptop down, disconnect the charger and all peripherals, and hold the power button for a few seconds to discharge residual power. Work on a clean, non-conductive surface and, if possible, use an anti-static wrist strap.
Opening the bottom panel
- Place the laptop upside down with the rear vents facing away from you.
- Undo the six screws that secure the bottom plate. One of them is captive and will stay attached to the panel — just ensure it’s fully loosened.
- Insert a thin plastic pry tool between the panel and the chassis near one of the edges.
- Gently twist the tool to release the first clip, then work your way around the perimeter, popping the clips along the sides and the front.
- Once all clips are released, lift the bottom panel away and set it aside.
Caution: Use only plastic tools on the painted surfaces and around the vents to avoid scratches or bending the cover.
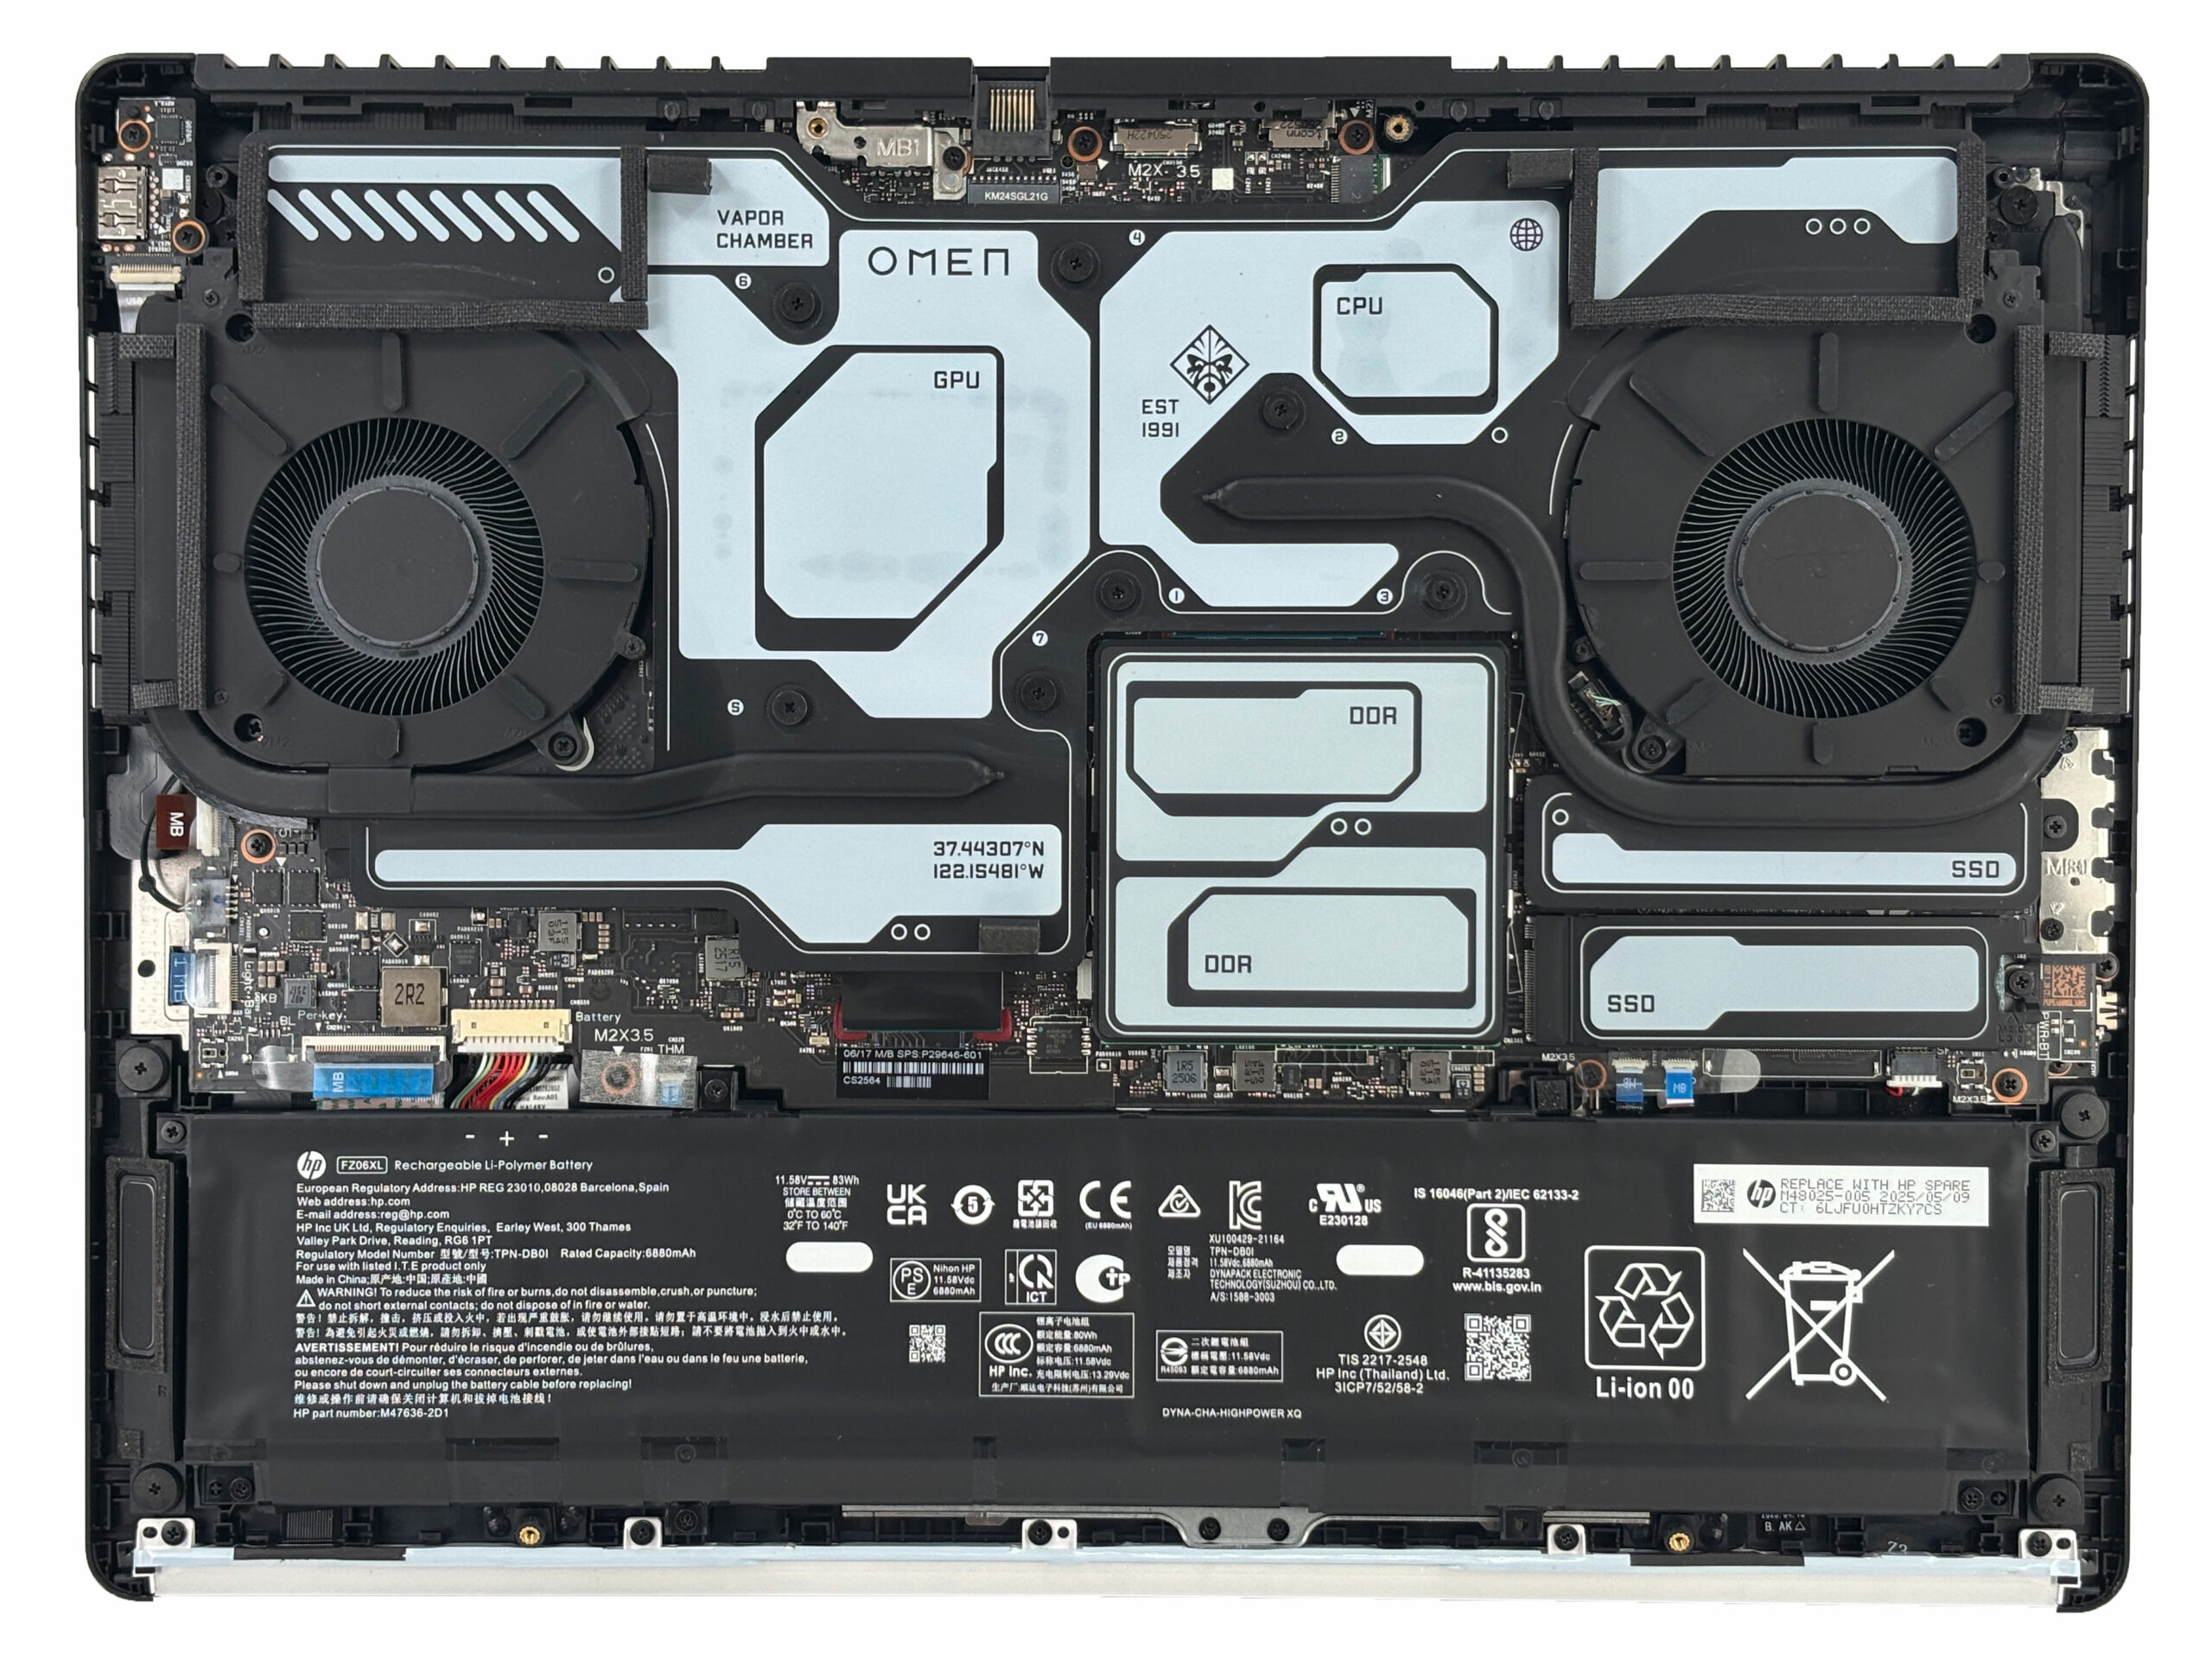
Battery removal and replacement
- Inside, locate the 6-cell battery pack (83Wh) spanning the front edge of the chassis.
- Identify the battery connector and gently pull the plastic housing straight out of the board to disconnect power.
- Undo the screws that secure the battery to the chassis. Keep track of their locations for reassembly.
- Lift the battery out of its bay, taking care not to pinch any speaker or Wi-Fi antenna cables.
- To install a replacement pack, position it flat in the tray, reinstall all screws, and firmly reconnect the battery cable so it is fully seated.
More info: The 83Wh Li-polymer battery supports fast charging (up to ~50% in about 30 minutes when the system is off), which is useful to test quickly after reassembly.

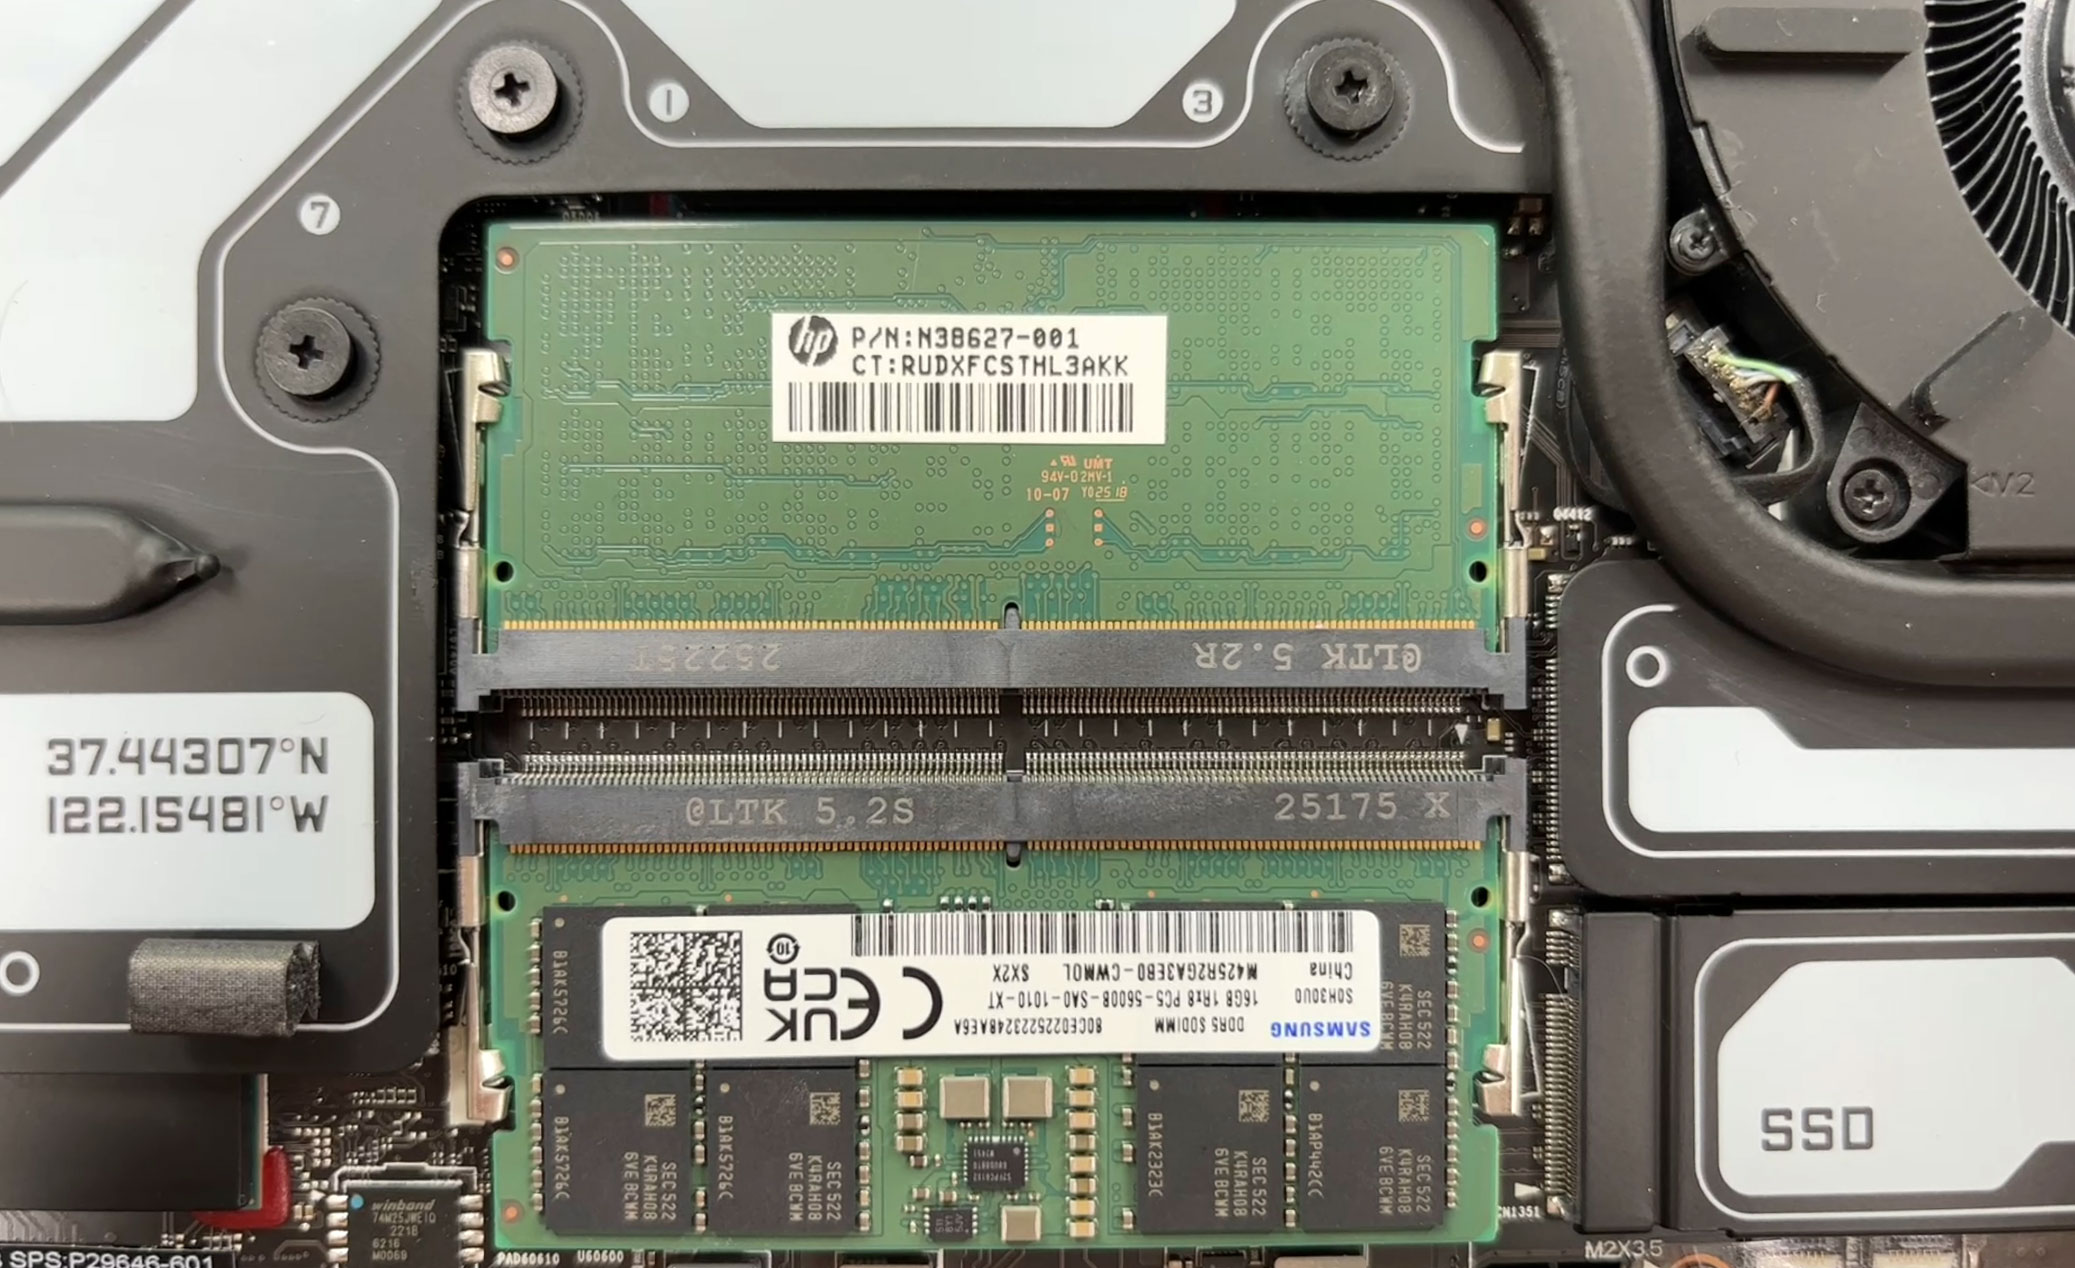
Memory (RAM) upgrade options
- Locate the two SODIMM slots in the central area of the motherboard, covered by labeled shields or thin thermal pads.
- Carefully peel back or lift the shielding so it can be reused later. Don’t damage or discard the thermal pads on top of the modules.
- The system uses standard DDR5 SODIMMs. Depending on configuration, you can get DDR5-5600 or DDR5-6400 modules. Our unit ships with 32GB (2×16GB) DDR5-5600 Samsung sticks.
- To remove a module, push the two side clips outward. The SODIMM will spring up at an angle.
- Slide the module straight out of the slot.
- To install new RAM, align the notch in the SODIMM with the key in the slot, insert it at an angle, then press it down until both clips snap into place.
- Reposition the shield and thermal pads so they sit flat and make good contact with the memory.
You can buy DDR5 RAM modules here: Buy from Amazon.com (#CommissionsEarned)
Storage upgrade options
- The HP OMEN MAX 16 (Intel) has two M.2 slots for NVMe SSDs:
- Slot 2: User-accessible under a labeled shield. This is the recommended bay for upgrades because it doesn’t require cooler removal.
- Slot 1: Located under the vapor chamber alongside the VRM modules. Access here requires removing the entire cooling assembly.
- Configurations vary:
- Top-tier RTX 5090 / 5080 / 5070 Ti models can ship with a PCIe Gen 5 x4 SSD.
- Other variants use PCIe Gen 4 x4 SSDs up to 2TB, including dual-storage options with two 512GB drives.
- To upgrade the secondary (user-accessible) bay:
- Remove the SSD shield or label by undoing its screw or gently peeling it back.
- Undo the SSD’s mounting screw; the drive will pop up at an angle.
- Slide the SSD out of the connector and insert a new PCIe 4.0 or 5.0 NVMe drive (per your configuration) at the same angle.
- Press it down and secure it with the screw, then reinstall the shield and ensure the thermal interface covers the drive.
- Advanced: Accessing the primary SSD (Slot 1) requires removing the vapor chamber. Only attempt this if you have:
- Fresh liquid metal for the CPU and GPU contact surfaces, and
- A replacement white phase-change pad for the VRM and power rails.
If you don’t have these materials, leave Slot 1 untouched and use only the secondary M.2 bay for upgrades.
You can buy PCIe 4.0 SSDs here: Buy from Amazon.com (#CommissionsEarned)
You can buy PCIe 5.0 SSDs here: Buy from Amazon.com (#CommissionsEarned)
Hint: Consider reviewing our Top M.2 SSDs Performance Rankings to select the best storage solution for your needs.
Wireless card and other replaceable components
- The Wi-Fi card sits in its own M.2 slot and is secured by a single screw with two antenna leads (Main and Aux).
- Depending on configuration, you will find either:
- Intel Wi-Fi 7 BE200 with Bluetooth 5.4, or
- Intel Wi-Fi 6E AX211 with Bluetooth 5.3.
- To replace the card, gently lift the antenna connectors straight up with a plastic tool, undo the retaining screw, and slide the module out of the slot.
- Insert the new card at an angle, press it down, secure it with the screw, and reconnect the antennas to their labeled posts.
- The large clickpad assembly and its small board are reachable once the bottom cover is removed. The stereo speakers are also screwed in, making both components straightforward to replace if needed.
Cooling system and maintenance
- The OMEN MAX 16 uses two large fans and a vapor chamber that spans both the CPU and discrete GPU.
- HP applies liquid metal on the CPU and GPU dies for improved thermal performance, while the VRM and power components are cooled with a white phase-change pad.
- For routine maintenance, disconnect the battery first, then:
- Hold each fan in place and use short bursts of compressed air through the rear and side vents to clear dust from the heatsink fins.
- Visually check foam seals and shields around the CPU, GPU, DDR, and SSD zones to ensure they haven’t shifted.
- Advanced servicing: If you ever remove the vapor chamber:
- Carefully note the liquid metal contact areas on the CPU and GPU and the exact placement of the white phase-change pad over the VRMs.
- You must fully clean and reapply liquid metal and install a new phase-change pad in the same locations before reassembly.
- Improper application can lead to overheating or component damage, so this procedure is recommended only for experienced users.
Reassembly tips
- Before closing the laptop, verify that:
- The battery connector is firmly seated.
- RAM modules are locked in place and their shields / pads are reinstalled.
- All SSDs and the Wi-Fi card are secured with screws and covered by their shields or labels.
- Fan cables and speaker connectors are properly plugged in.
- Place the bottom panel back on the chassis, aligning ports and edges.
- Press gently around the perimeter until all clips snap back into place.
- Tighten the six screws (including the captive one). Snug them down without overtightening.
- Power on the system and check in BIOS / Windows that the new RAM and SSDs are detected and that fan behavior is normal.
More info: The HP OMEN MAX 16 is very serviceable for RAM, the secondary M.2 slot, battery, Wi-Fi card, speakers, and clickpad. Work under the vapor chamber (primary SSD and direct CPU/GPU access) is considered advanced and should only be done when you have the correct liquid metal and VRM phase-change materials available.
HP OMEN MAX 16 (16-ah0000) in-depth review
The HP OMEN MAX 16 is a master of disguise. At first glance, its sleek, understated black chassis looks more like a high-end workstation than a gaming monster. But beneath that subtle exterior lies the absolute pinnacle of mobile performance: an RTX 5090 GPU and a top-tier Intel Core Ultra 9 processor. This is a "sleeper" in the truest sense, a laptop that avoids the flashy RGB excess of its rivals to focus purely on what matters: raw power and exceptional cooling. But does this focus on stealth and stability come at a cost to endurance? We put this unassuming beast to the test to find out[...]

Pros
- Exceptional thermal management keeps CPU and GPU very cool
- Excellent, stable gaming performance with RTX 5090
- Great upgradeability with two RAM and two M.2 slots
- PWM-free display with accurate colors is great for work and play
- Sleek, understated design with premium build quality
- Comprehensive port selection including Thunderbolt 4
Cons
- Poor battery life (approx. 3 hours)
- Half-height arrow keys are not ideal for gaming
- Upgrading the primary SSD requires removing the cooling system


![[May 2026] Amazon Global: Top 10 Best-Selling Gaming Laptops – Budget-Friendly ASUS TUF Gaming A15 Dominates the Market](https://laptopmedia.com/wp-content/uploads/2026/06/Best-Selling-Gaming-Laptops-GLOBAL-Top-10-400x225.jpg)
![[May 2026] Amazon Global: Top 10 Best-Selling Laptops – Apple’s Affordable ‘MacBook Neo’ Takes the Crown Amidst Strong Air and Pro Sales](https://laptopmedia.com/wp-content/uploads/2026/06/Best-Selling-Laptops-GLOBAL-Top-10-400x225.jpg)
![[May 2026] Best-Selling Laptop Brands on Amazon Global – Apple Dominates in Units and Revenue](https://laptopmedia.com/wp-content/uploads/2026/06/GLOBAL-Best-Brands-400x225.jpg)