Inside ASUS ZenBook Flip 14 UM462 – disassembly and upgrade options
This notebook can be considered as the AMD version of the ZenBook Flip 14 UX463 or as the 2-in-1 version of the ZenBook 14 UM431.
Check out all ASUS ZenBook Flip 14 UM462 prices and configurations in our Specs System or read more in our In-Depth review.
1. Remove the bottom plate
This laptop’s bottom panel is held in place by 10 Phillips head screws, as 8 of them are clearly visible and two are hidden beneath the back feet. In order to access them, you can just pop them away easily with a flat tool. Then, you can use the same tool (preferably plastic) to pry the plate itself.

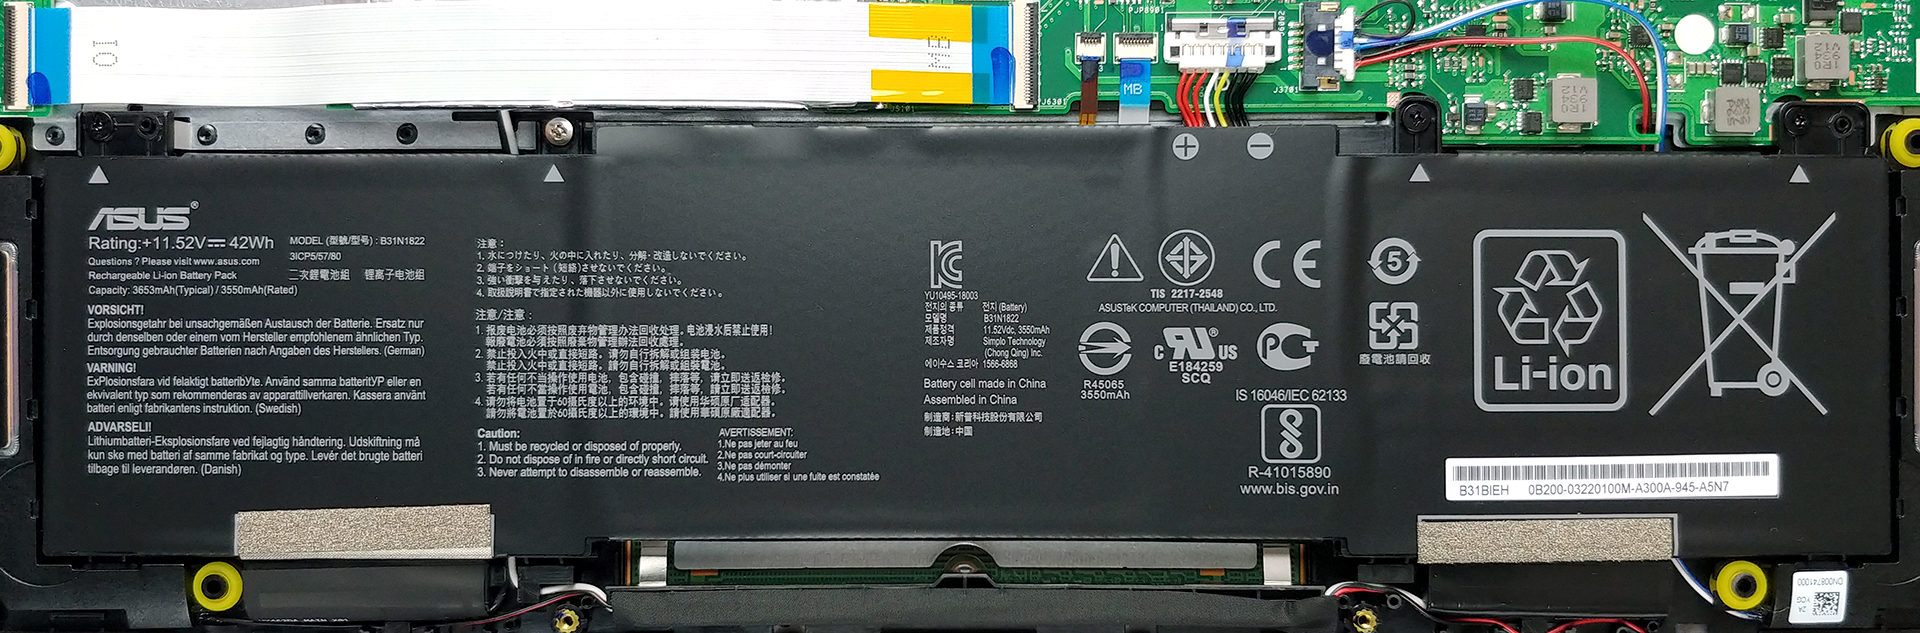
2. Battery
On the battery side, we see a 42Wh unit. Naturally, it is the first thing you want to unplug before messing with the hardware inside.
3. Memory and storage
Just beneath the processor, you’re able to see the soldered memory chips. Sadly, there are no SODIMM slots for expansion. However, there is a single M.2 PCIe x2 slot for fast NVMe SSD storage.

4. Cooling system
Hiding inside there is a single heat pipe that cools of the Ryzen processor. It’s good to see that this heat pipe is relatively bulky, and the heat spreader is rather long.

Check out all ASUS ZenBook Flip 14 UM462 prices and configurations in our Specs System or read more in our In-Depth review.


![[June 2026] Best-Selling Laptop Brands on Amazon Global – Apple’s Unrivaled Dominance in Units and Revenue](https://laptopmedia.com/wp-content/uploads/2026/07/GLOBAL-Best-Brands-400x225.jpg)
![[June 2026] Amazon Global: Top 10 Best-Selling Laptops – Apple’s New MacBook Neo Storms to #1, Reshaping the Market with Affordability](https://laptopmedia.com/wp-content/uploads/2026/07/Best-Selling-Laptops-GLOBAL-Top-10-400x225.jpg)
![[June 2026] Amazon Global: Top 10 Best-Selling Gaming Laptops – Acer’s Nitro V 16S AI Dominates Sales, While ASUS Leads Overall Revenue](https://laptopmedia.com/wp-content/uploads/2026/07/Best-Selling-Gaming-Laptops-GLOBAL-Top-10-400x225.jpg)
![[June 2026] Global Ranking of Best-Selling Laptop GPUs on Amazon – NVIDIA RTX 5060 is the Top-Selling Dedicated GPU](https://laptopmedia.com/wp-content/uploads/2026/07/Best-Selling-GPUs-GLOBAL-Top-10-400x225.jpg)
![[June 2026] Global Ranking of Best-Selling Laptop CPUs on Amazon – Apple M5 Dominates, AMD Ryzen 7 260 Gets Solid Premium Share](https://laptopmedia.com/wp-content/uploads/2026/07/Best-Selling-CPUs-GLOBAL-Top-10-400x225.jpg)
