Inside Dell Inspiron 5558 (15 5000) – disassembly, internal photos and upgrade options
Dell Inspiron 5558 is really similar with the more affordable Inspiron 5551 when it comes to upgrade options and disassembly. Overall the upgrade options are not much, but they are pretty easy to perform, as nearly everything you can upgrade is hidden under the surface cover. Unfortunately when it comes to cleaning the internals from dust, opening the notebook can be quite a hassle.
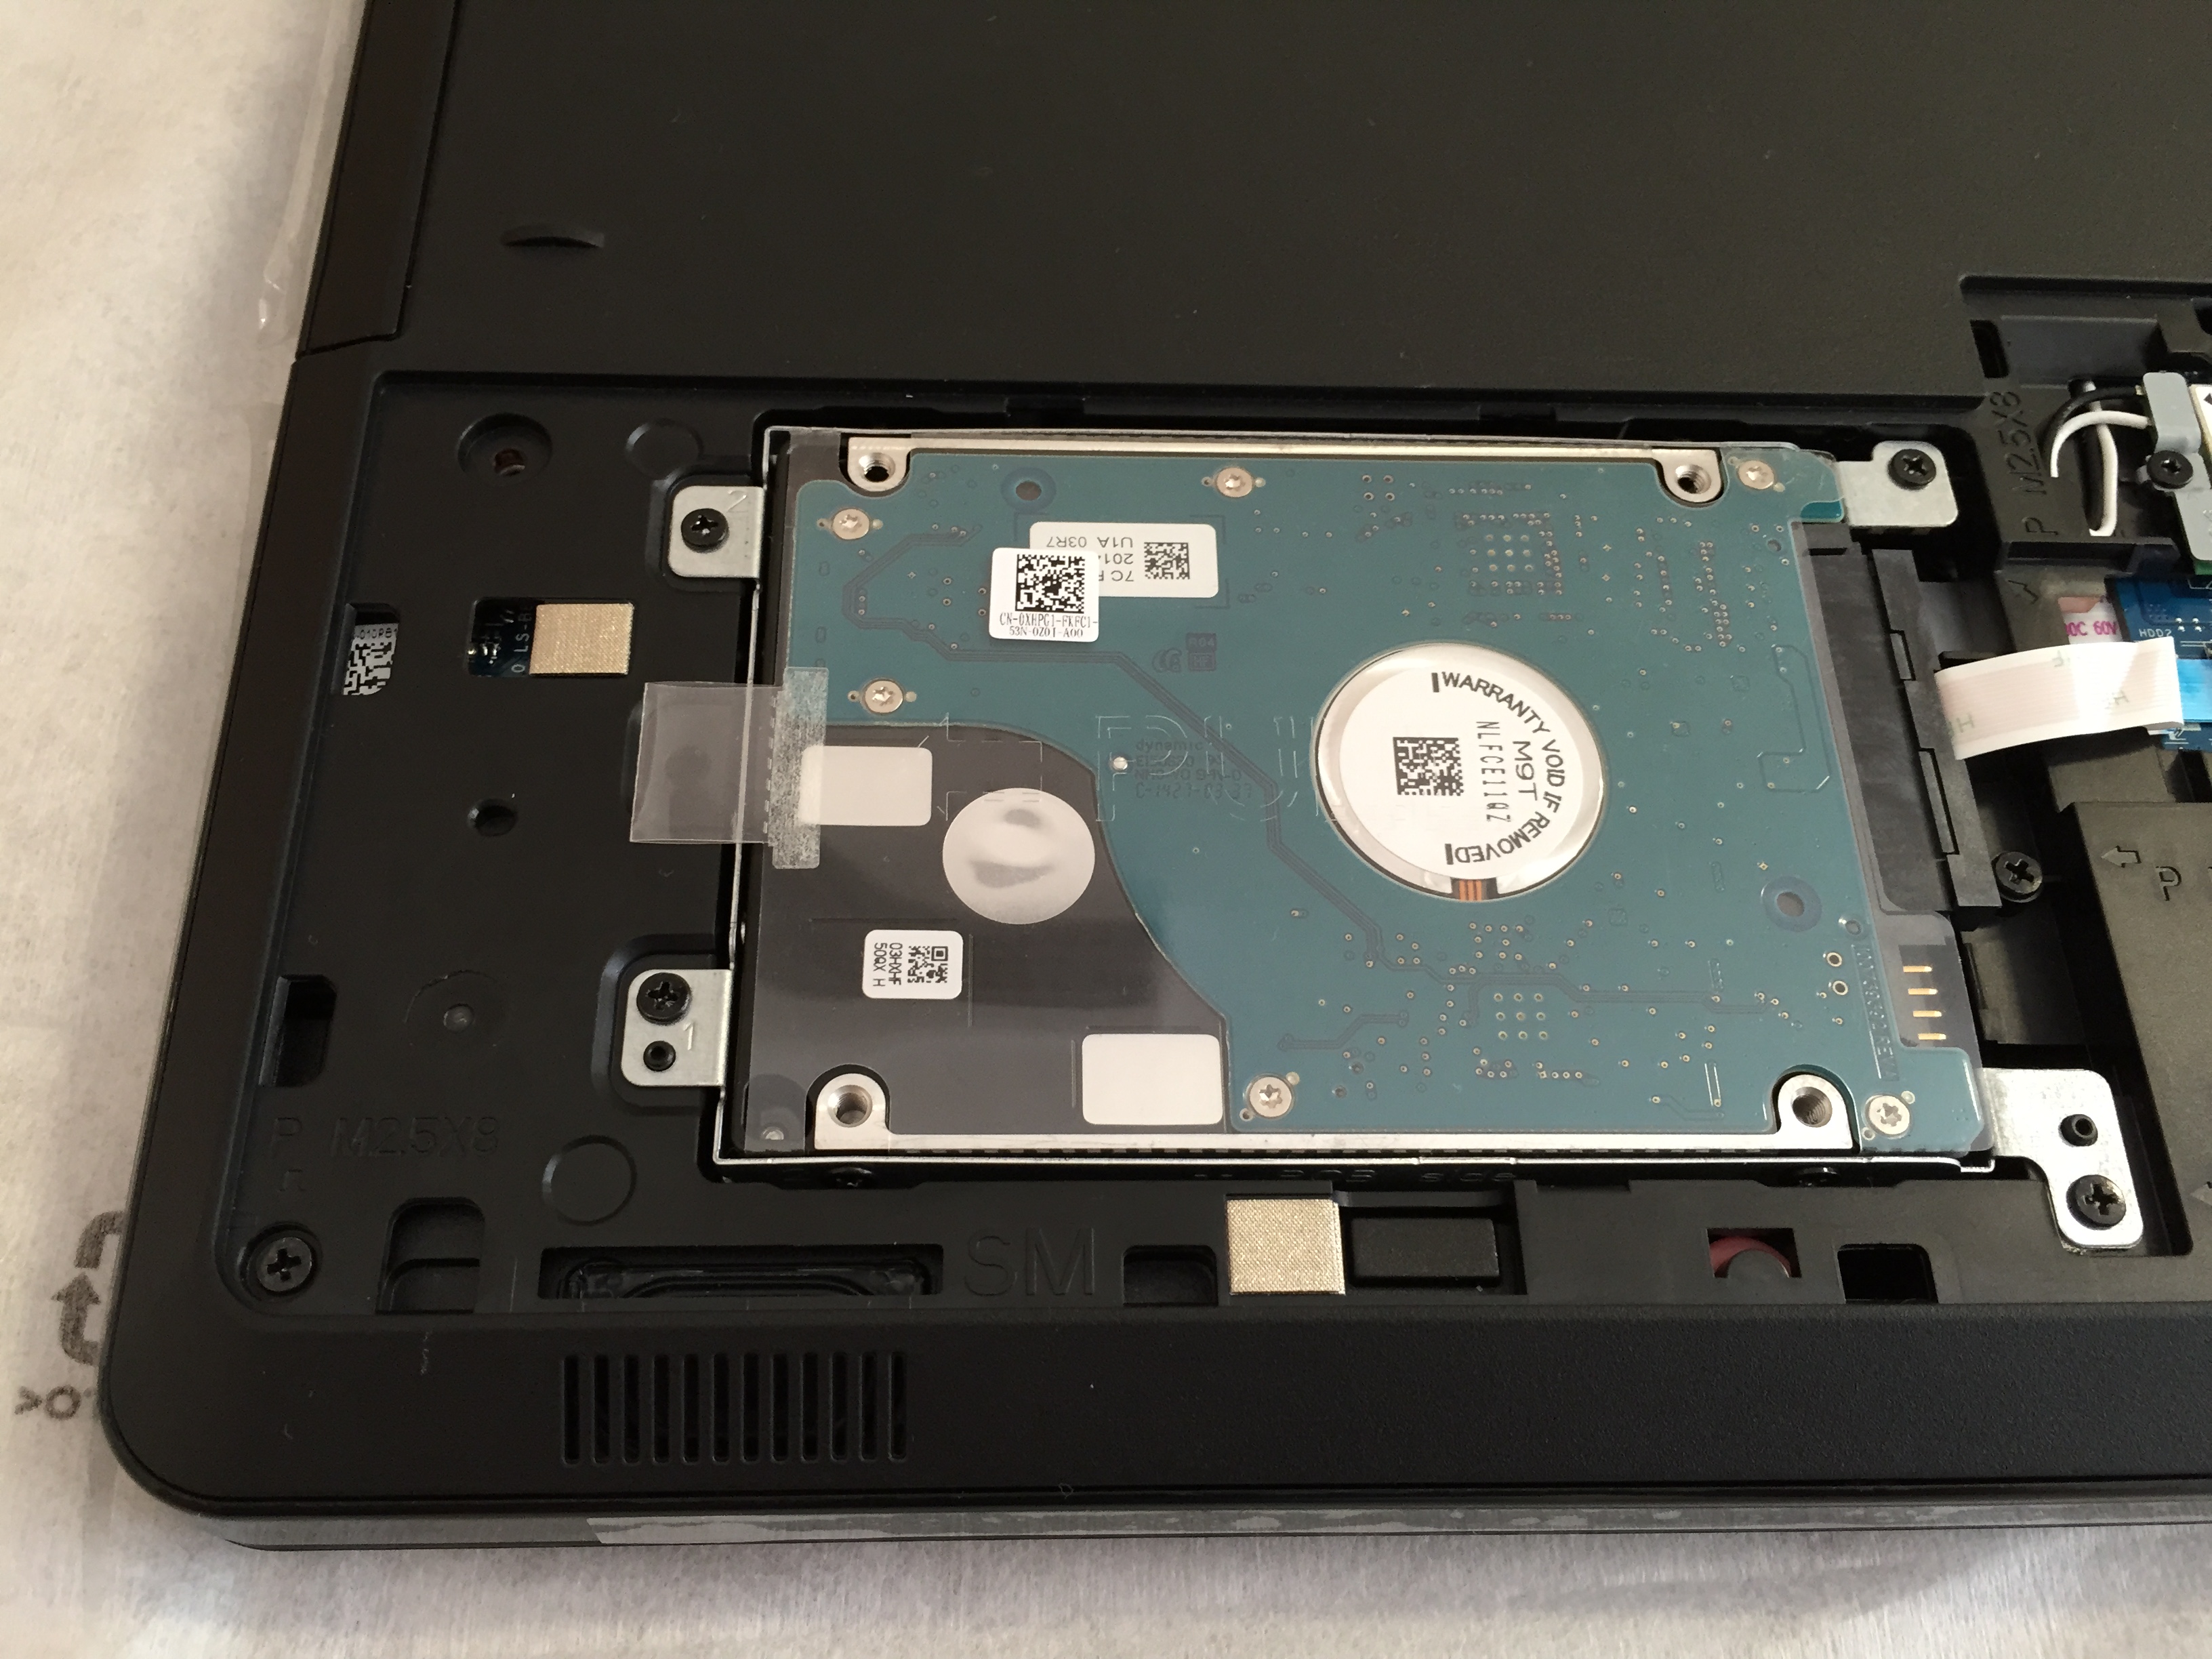
1. Removing the service cover
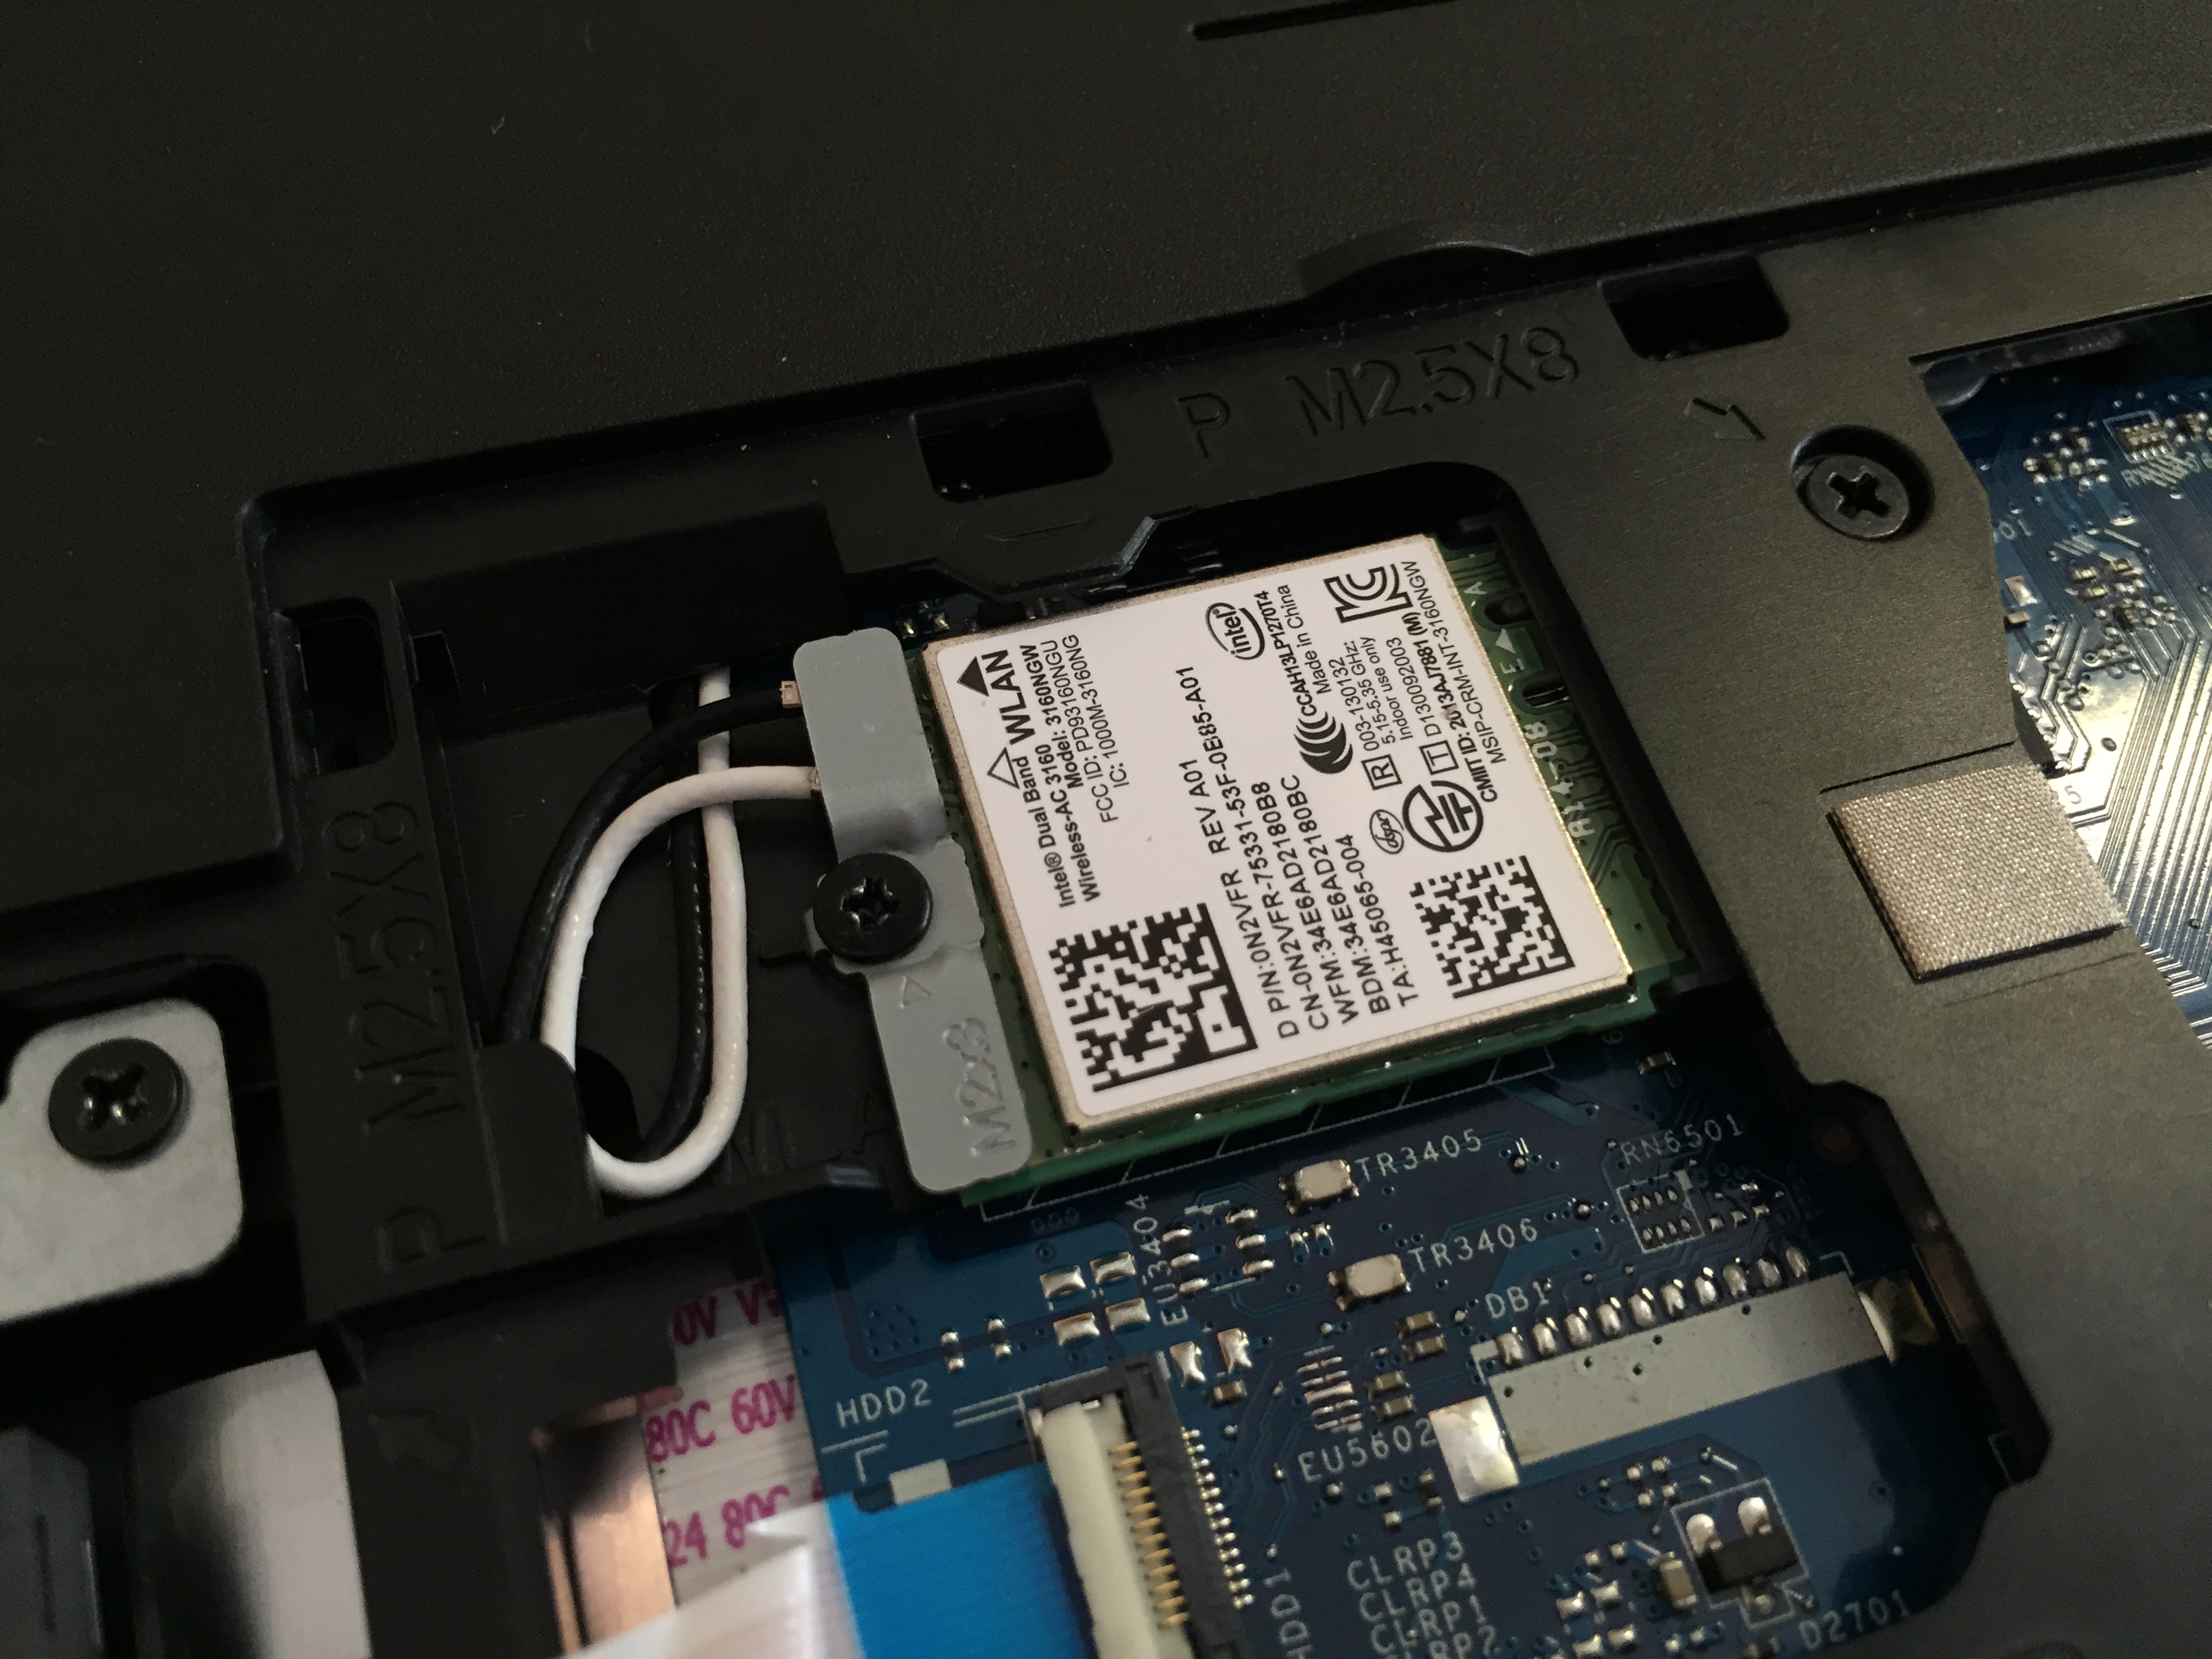
There are only two screws that keep the main service cover down. Underneath we have pretty standard upgrade options for HDD and RAM. We have two RAM slots for up to 8GB in each, or a total of 16GB DDR3 memory. There is also a Wi-Fi module available – Intel’s Wireless-AC 3160 and a BIOS/UEFI battery. In the 2.5” HDD bay we have a 2TB Samsung SpinPoint drive.

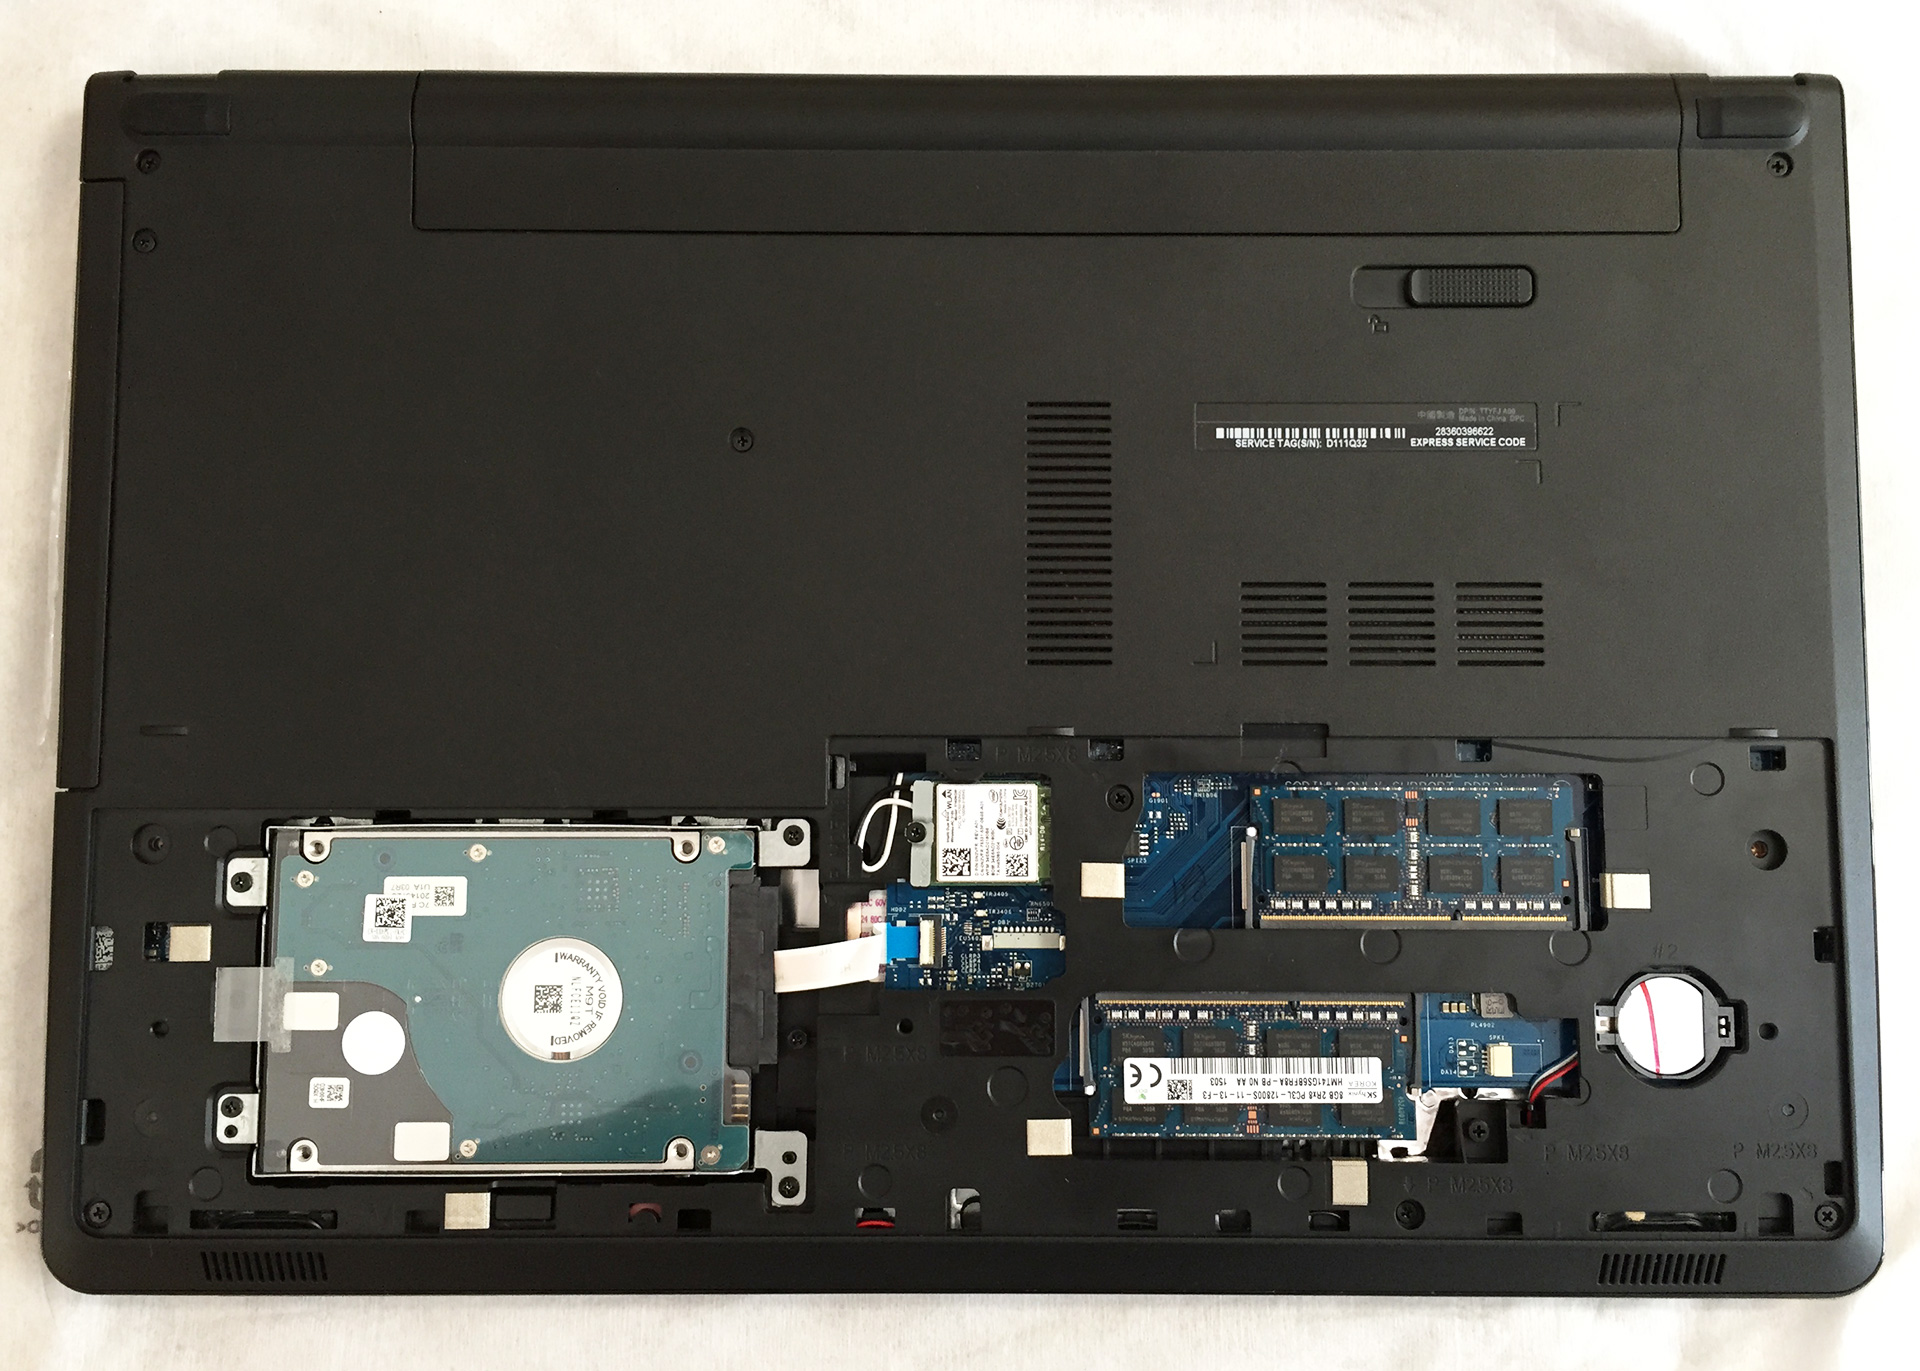
We did not find any M.2 SSD slot during the disassembly, but you can always replace your optical device with a caddy for an additional 2.5” HDD or SSD.


2. Removing the keyboard
In order to access the complete internals of the device, you will have to remove the keyboard. Using a thin plastic tool (or a credit card for example) pop the pins in the clips in the small holes on the top edge of the keyboard and lift it. Beneath the keyboard are several bolts that need to be unscrewed and a few cables to be detached.


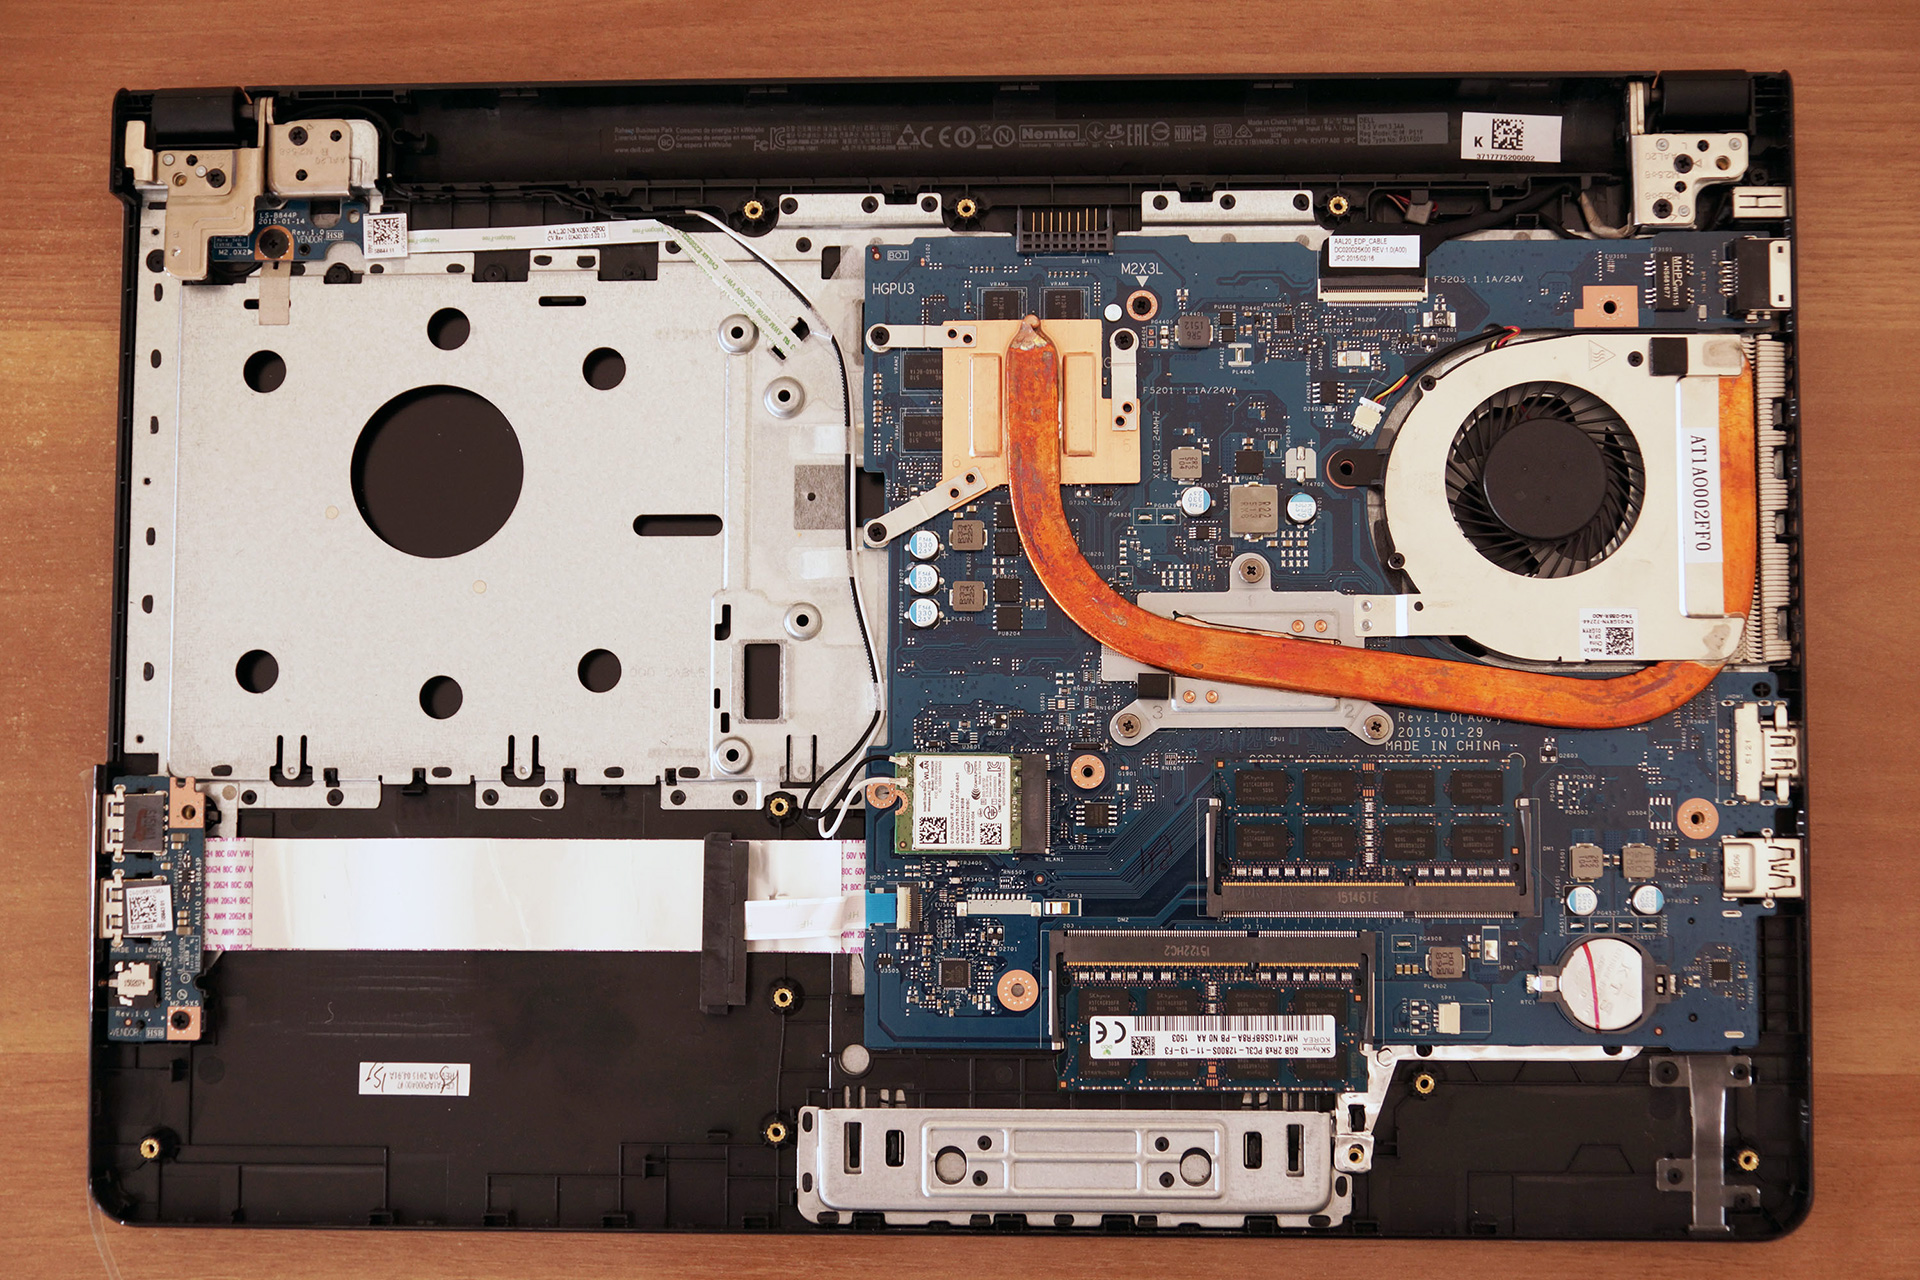
3. Removing the bottom part of the chassis
After you have removed the keyboard turn the device around and continue with the back panel. There are a total of 16 bolts that need to be unscrewed – two of them are holding the optical drive, remove them first and remove the optical drive, as there are 3 bolts hidden underneath it and continue with the rest of the screws. The next step is popping out the entire bottom part of the case, again with the help of the plastic tool. When lifting the bottom part, be careful, as there are two very stiff pins on the two sides of the battery compartment, which can be quite hard to pop off. After that, you can proceed with cleaning the fan from dust.


![[June 2026] Best-Selling Laptop Brands on Amazon Global – Apple’s Unrivaled Dominance in Units and Revenue](https://laptopmedia.com/wp-content/uploads/2026/07/GLOBAL-Best-Brands-400x225.jpg)
![[June 2026] Amazon Global: Top 10 Best-Selling Laptops – Apple’s New MacBook Neo Storms to #1, Reshaping the Market with Affordability](https://laptopmedia.com/wp-content/uploads/2026/07/Best-Selling-Laptops-GLOBAL-Top-10-400x225.jpg)
![[June 2026] Amazon Global: Top 10 Best-Selling Gaming Laptops – Acer’s Nitro V 16S AI Dominates Sales, While ASUS Leads Overall Revenue](https://laptopmedia.com/wp-content/uploads/2026/07/Best-Selling-Gaming-Laptops-GLOBAL-Top-10-400x225.jpg)
![[June 2026] Global Ranking of Best-Selling Laptop GPUs on Amazon – NVIDIA RTX 5060 is the Top-Selling Dedicated GPU](https://laptopmedia.com/wp-content/uploads/2026/07/Best-Selling-GPUs-GLOBAL-Top-10-400x225.jpg)
![[June 2026] Global Ranking of Best-Selling Laptop CPUs on Amazon – Apple M5 Dominates, AMD Ryzen 7 260 Gets Solid Premium Share](https://laptopmedia.com/wp-content/uploads/2026/07/Best-Selling-CPUs-GLOBAL-Top-10-400x225.jpg)

What an explanation. Great!
I spilled a little amount of tea on the laptop it fell upon the trackpad and a few mm on its side you can say on the entire trackpad I wiped it off tried to soak dry what ever might have gone inside although it didn’t look like much of it went down there maybe a drop or more across the lining what should I do also are the internals(motherboard) directly under the trackpad or there is some amount of protection please guide me
can i change the nvidia graphics card or no
my 5558 is i5 and comes with a non-backing keyboard, can i replace my keyboard with a back-light keyboard
if yes, where can i find one?
I also wish to replace my keyboard with a backlit version. Were you successful in replacing the keyboard? Found this on YouTube https://www.youtube.com/watch?v=8yY3j8ifvB8 but it is for a prior model (5547). On the 5558 model, it looks a bit different underneath the keyboard. Not clear where/how to attach the smaller cable which exists only on the backlit version. Grateful for any advice or information you could share with me. I will do same.
i know this is a few years late, but this keyboard worked perfectly for my Inspiron 5558. the upgrade was pretty easy to install too. just need to make sure you attach the ribbon cables on well enough. https://www.amazon.com/gp/product/B06XCRW2BQ/ref=ppx_yo_dt_b_asin_title_o08__o00_s00?ie=UTF8&psc=1
can I change gpu in this laptop???
thanks in advance
If you have the tools, expertise and patience to resolder BGA ICs, sure.
I have dell 5000 series 5558 laptop(i5 5th gen, 8 gb ddr3,4gn nvedia 920 m graphics) can u please tell whether my laptop supports msata or not..
please reply on my mail.. [email protected]
Im not very sure, but the Optical drive connector looks like a msata, however you can connect a sata ssd instead of the hdd and it will work full speed (Sata 3 6Gbps), i upgraded mine and its so fast now (dell inspiron 5000 series 5558 i7 5500u, 8gb ram, geforce 920m)
Can I replace the gpu on this laptop without having to change the motherboard or is it necessary to change the motherboard as well
To replace optical drive with caddy, what caddy i need to go for, would it be like http://www.ebay.co.uk/itm/321049398174.
Would above one will be enough.
I apologize for reviving this dead thread, but did you by chance have any luck replacing your optical drive with a caddy on your Dell Inspiron 5558?
Is it possible to remove/replace the cpu? I have an Intel i3 and want to put in an i5.
Thank you for your question, Need insight!
To the best of our knowledge, it is not possible to perform such an upgrade.
Best regards,
Dimitar Karamitev
I am having g trouble removing the Main Service cover in step one. After removing the screws, I try to lift the cover up from the designated location, yet it doesn’t budge.
is it possible to upgrade its(5558) processor speed… its now i5 Ghz 1.6… 1.6 seems low.. can I upgrade it??
No, on modern laptops almost all the processors are fixed into the mother board as well as the graphics, maybe on tech repair shops they could try solder a new one but i do not ensure it will work as i havent seen anyone do it, you can as always try to overclock, or use the Intel speed boost, just enable the high performance energy setting. On the other side 1.6 its slow i had an amd @1.6Ghz but do you really plan on using it a lot? like play demanding games, design? 1.6 its good for Little games, office,… Read more »
I have Dell inspiration 5558 i3 processor leptop.in this leptop I have Intel graphics card can I change it or run 2 graphics card in this leptop?
Έχω dell 5558 με επεξεργαστή ι5.το πληκτρολόγιο ήπιε λίγο γάλα και το άνοιξα ολο..το έχει στεγνώσει αλλά δένονται οι λεκέδες στην Motherboard μπορώ να τους καθαρίσω άκουσα κάτι για καθαρό υνοπνευμα
Hello, I have a ttyfja00 DELL with battery charging problem (when charger is connected, laptop works but battery doesn’t charge (seems to charge 2-3 seconds then stops to charge).
I’d like to change the AC connector + cable.
I’m looking for the informations about this connector.
Can somebody help ? Thanks in advance !
Can I replace my 5558 HDD to SDD?